Your evaporative cooler will need to be installed outside of your home. It can be installed in various locations, depending upon the type of cooler chosen. The three types of coolers are:
- Down-draft (mounted on the roof)
- Side-draft (mounted on an eave or window)
- Up-draft (mounted on the ground)
Roof mounted are the most common, although they are more difficult to maintain.

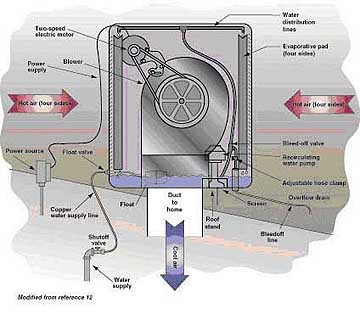
Figure 1: A typical down-draft swamp cooler

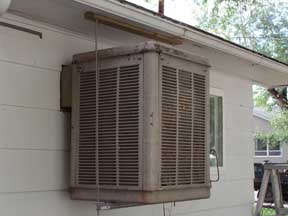
Figure 2: A typical side-draft cooler.
Mounted coolers are connected to ducts that bring the cooled air into the rooms of your home. In some cases, existing ductwork is used to move the air to the various rooms. Roof mounted systems are often the easiest to connect to existing duct systems.
Alternatively, ductwork can be designed specifically for an evaporative cooler to channel the air into the rooms of your the home. This will depend on what type of system that you are installing. The three systems are:
- Stand alone evaporative coolers (designed ductwork)
- Stand alone alternative to a refrigeration system (designed ductwork)
- Combined system (shares ductwork with a refrigeration system)
The only problem associated with the combination system is that refrigeration ducts are often too small to move the amount of air required by evaporative coolers. This causes less airflow and more noise. Also, combined systems require that a damper be installed to separate the units.
Otherwise the refrigerated air will escape through the evaporative cooler and the moist air will corrode the refrigeration system. In smaller, open homes, cooled air can be blown into a central location without ductwork.
How swamp coolers work
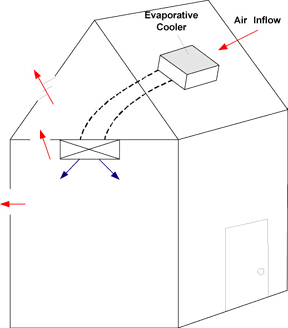
Evaporative coolers work by cooling fresh air from outside that replaces the warm air in the house. Thus, you need to open windows or doors to let the warm air escape. If this presents a security concern for you, you may want to think about installing ceiling vents.

Figure 3: Mounted coolers are connected to ducts that bring cooled air into your home. Warm air escapes through open windows or ceiling vents.
Your evaporative cooler will also need to be plugged into a nearby 120 volt wall outlet. Be sure that there is an electrical disconnect for your safety during maintenance. There is no special wiring required (unlike air conditioners that often require a high amperage power circuit).
You should also install a low voltage thermostat that will turn the cooler on and off automatically. Finally, be sure that there is an accessible cooler water shutoff valve.
Coolers should be installed at least 10 feet away from or 3 feet below plumbing vents, combustion appliance flues, clothes dryer vents, or exhaust fan vents. Keep animals, yard chemicals, and fuels and solvents away from the cooler vicinity. Provide a minimum of 3 ft of clearance to any side of the cooler that requires access for maintenance.
When you install your cooler, check the float valve setting after one pump cycle. This way you can make sure that the float isn’t set too high, which would cause the reservoir of water to overflow.
- What to Do if Your House Smells Like Gas but There’s No Leak - February 6, 2023
- Why Is There a Burning Smell Coming From My Vents? - August 16, 2022
- How to Remove the Musty Smell From Your Air Conditioner - August 16, 2022
